
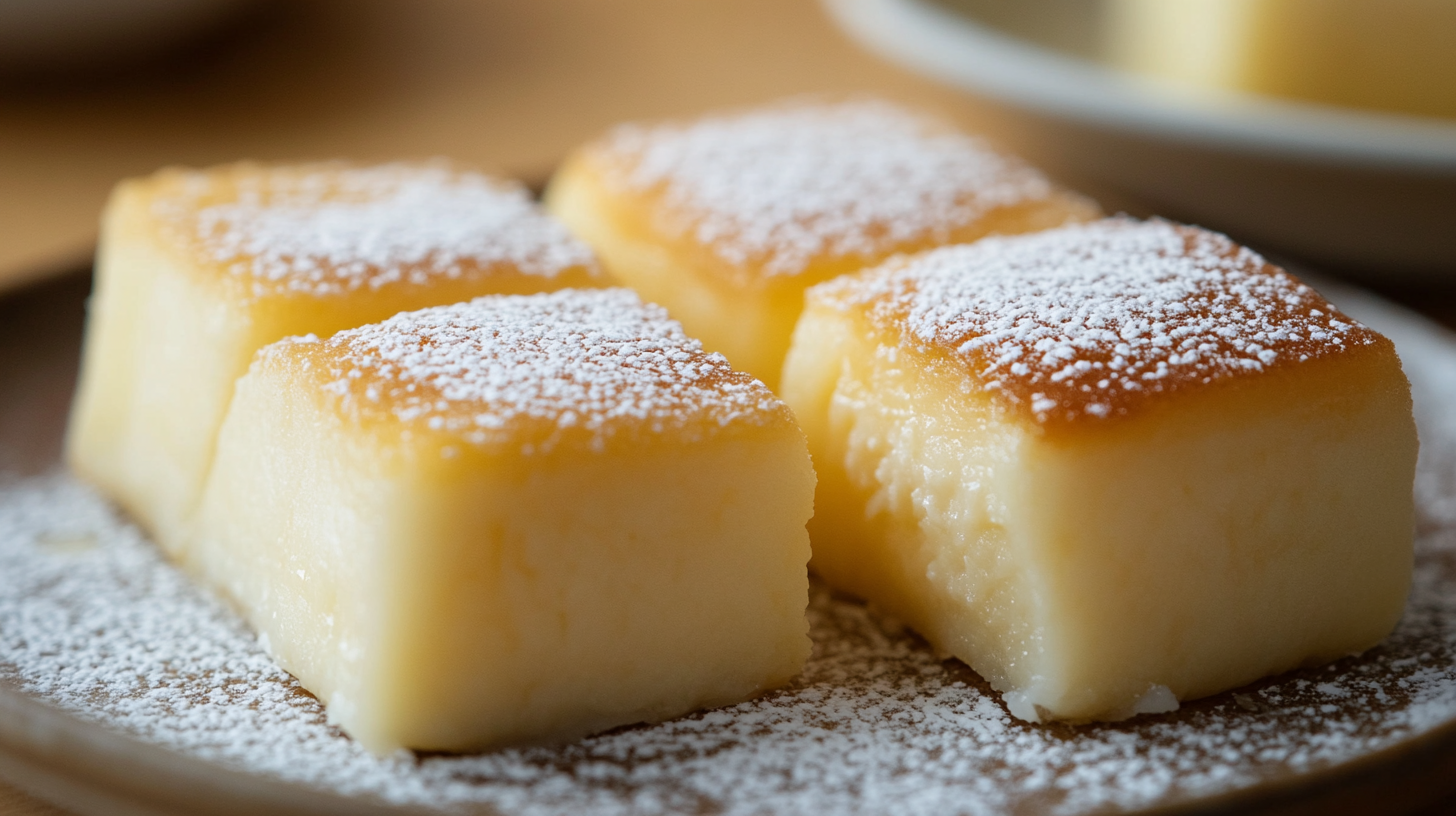
Get ready to make the best butter mochi recipe ever. It’s soft and chewy, just like the ones from Hawaiian bakeries. The secret is Mochiko Flour, also known as glutinous rice flour.
This recipe makes 24 squares of butter mochi. It’s perfect for parties or gatherings. You’ll love how easy it is to make.
Using the right ingredients is key. You’ll need Mochiko Flour, sugar, and melted butter. This mix creates a soft and chewy texture. The recipe takes about 1 hour and 15 minutes to make.
It can be stored for up to 2 days in an airtight container. With a 4.57 rating from 610 users, it’s a trusted favorite. You’ll need 1 box of Mochiko Flour and 2 cups of sugar to make it.
This butter mochi recipe is perfect for any occasion. It’s soft and chewy, impressing everyone. It’s easy to make, needing just 4 large eggs, 1 can of coconut milk, and 1 stick of unsalted butter.
So, why not try it? It’s a favorite for its sweet and flavorful taste. It’s the ideal choice for a soft and chewy dessert.
What Is Butter Mochi: A Hawaiian Delicacy
Butter mochi is a favorite in Hawaii and loved around the world. It’s known for its special texture and taste. This dessert is a big part of Hawaiian culture, enjoyed at many celebrations.
The recipe for butter mochi uses glutinous rice flour, coconut milk, and melted butter. These ingredients make it chewy and sweet. You can try different flavors like ube, matcha, and chocolate, making it a favorite for many.
- It is made with glutinous rice flour, which is gluten-free
- It has a unique texture that is both chewy and soft
- It can be flavored with various ingredients, such as ube, matcha, and chocolate
- It is a popular dessert in Hawaii and is often served at special occasions
Butter mochi holds a special place in Hawaiian culture. Its popularity has grown a lot over time. Learning about its history and cultural importance makes it even more special and delicious.
Essential Ingredients for Perfect Butter Mochi
To make perfect butter mochi, you need a few key ingredients. These are Mochiko Flour, Coconut milk, and Unsalted butter. The quality of these can really change how your butter mochi tastes and feels.
Here are the essential ingredients you will need:
- 1 box of Mochiko Flour (16 oz)
- 1 can of unsweetened Coconut milk (13.5 oz)
- 4 oz of Unsalted butter (approximately 113g)
- Granulated sugar
- Eggs
- Evaporated milk
Using top-notch ingredients like fresh Coconut milk and real Unsalted butter makes a big difference. The Mochiko Flour is what makes butter mochi special, giving it its unique taste and texture.

With these essential ingredients, you can make delicious, authentic butter mochi. Make sure to pick the right Mochiko Flour and Coconut milk for the best results.
| Ingredient | Quantity |
|---|---|
| Mochiko Flour | 16 oz |
| Coconut milk | 13.5 oz |
| Unsalted butter | 4 oz |
Kitchen Tools and Equipment Needed
To make delicious butter mochi, you’ll need the right kitchen tools and equipment. Having these essential items will ensure that your mochi turns out soft, chewy, and perfectly textured. A large mixing bowl and a whisk are must-haves. These help you mix and blend the ingredients thoroughly, which is crucial for achieving the right consistency.
In addition to these basic tools, mochi making equipment like a stand mixer can be very useful. A stand mixer can help you cream the butter and sugar together more efficiently. It can also handle the heavy mixing required for the glutinous rice flour. While a stand mixer is not essential, it can certainly make the process easier and faster.
Here are some other tools you may find useful when making butter mochi:
- A 9×13 inch baking dish
- A plastic disposable knife for slicing
- A measuring cup and spoons
- An electric mixer for creaming the butter and sugar
By having these kitchen tools and mochi making equipment on hand, you’ll be well on your way to creating delicious butter mochi that’s sure to impress. Remember to choose the right tools for the job, and don’t be afraid to invest in a few specialty items to make the process easier and more enjoyable.
| Tool | Description |
|---|---|
| Large Mixing Bowl | For mixing and blending ingredients |
| Whisk | For creaming butter and sugar together |
| Stand Mixer | For heavy mixing and creaming |
The Ultimate Butter Mochi Recipe Step by Step
To make this easy butter mochi recipe, start by preheating your oven to 350°F. Prepare a 9×13 inches baking pan. Kat Lieu’s recipe mixes melted butter and sugar, then adds eggs, coconut milk, and more. This easy butter mochi recipe makes 20 servings and takes 15 minutes to prepare and 1 hour to cook.
You’ll need 1 box of mochiko sweet rice flour, 2 cups of sugar, and 2 teaspoons of baking powder. Also, 1/2 teaspoon of salt, 1/2 cup of melted and cooled butter, 2 cups of whole milk, and 1 can of unsweetened coconut milk are required. Plus, 4 large eggs, lightly beaten, are needed. You can also add 1/2 cup of unsweetened shredded coconut for extra flavor.
- Preheat the oven to 350°F and prepare the baking pan.
- Mix together the melted butter and sugar, then add eggs, coconut milk, and other ingredients.
- Pour the mixture into the prepared baking pan and bake for 1 hour, or until the top turns golden brown.
Thiseasy butter mochi recipeis great for making a delicious and soft dessert. By following thisstep-by-step guide, you’ll create a mouth-watering butter mochi that will impress everyone.
Tips for Achieving the Perfect Texture
To get the perfect texture in your butter mochi, follow some key tips. Letting the mochi cool completely before cutting is crucial. It helps set the texture and prevents it from becoming too sticky or soft. Also, storing the mochi in an airtight container is vital to keep it fresh and maintain its texture.
Common texture problems include a too-chewy or too-soft texture. To fix these, try adjusting the glutinous rice flour ratio or add more silken tofu for creaminess. Here are some storage tips to keep in mind:
- Store the mochi at room temperature for up to 2 days in an airtight container.
- Store the mochi in the refrigerator for up to 1 week in an airtight container.
- Store the mochi in the freezer for up to 2 months when individually wrapped and stored properly.
By following these tips and storage recommendations, you can achieve the perfect texture in your butter mochi. Enjoy it for a longer period. Always pre-measure your ingredients and follow the recipe carefully for the best results.
With these tips and storage recommendations, you’ll create delicious butter mochi with a perfect texture. Impress your friends and family. So, go ahead and try it. Don’t hesitate to experiment with different flavors and ingredients to create your unique butter mochi recipe.
| Storage Method | Duration |
|---|---|
| Room Temperature | Up to 2 days |
| Refrigerator | Up to 1 week |
| Freezer | Up to 2 months |
Butter Mochi Without Coconut Milk: Alternative Options
When making butter mochi, you might not have coconut milk or prefer not to use it. Luckily, there are other ingredients you can use instead. Half and half or unsweetened coffee cream can give your mochi a similar richness and texture.
Use these alternatives in the same amount as coconut milk, which is 1 2/3 cups. Remember, using half and half or unsweetened coffee cream might change the taste and texture a bit. You might need to adjust the sugar or other ingredients to get the flavor right.

- Reduced calorie count
- Lower saturated fat content
- Increased versatility in recipe variations
Exploring these alternatives lets you make a tasty and unique butter mochi recipe. Whether you pick half and half, unsweetened coffee cream, or something else, you can enjoy the rich, chewy texture of butter mochi without coconut milk.
| Alternative Ingredient | Proportion | Flavor and Texture |
|---|---|---|
| Half and half | 1 2/3 cups | Rich, creamy texture and slightly sweet flavor |
| Unsweetened coffee cream | 1 2/3 cups | Smooth, velvety texture and subtle coffee flavor |
Customizing Your Butter Mochi
To make your butter mochi special, try different flavors and dietary changes. You can add ube or pandan extract for a unique taste. For those with special dietary needs, you can make adjustments.
Popular flavors include chocolate or using almond or soy milk. These changes can make your mochi taste and feel better, for you and your guests.
Flavor Variations
- Ube extract: adds a sweet and nutty flavor
- Pandan extract: gives a unique and refreshing taste
- Chocolate: adds a rich and decadent flavor
Dietary Modifications
To meet different dietary needs, you can tweak the recipe. Use gluten-free flour or natural sweeteners instead of sugar. These changes make your mochi inclusive and fun for all.
By trying out different flavors and dietary changes, you can make a butter mochi that’s just right for you. Whether you want to spice up the classic recipe or meet dietary needs, there’s a lot you can do.
| Flavor Variation | Dietary Modification |
|---|---|
| Ube extract | Gluten-free flour |
| Pandan extract | Natural sweetener |
| Chocolate | Lactose-free milk |
Troubleshooting Common Butter Mochi Issues
When making butter mochi, you might run into some common problems. These can mess up the texture and taste of your dessert. To fix these issues, it’s key to know how to troubleshoot. One big problem is if the mochi turns out too dense or dry.
To fix this, you can tweak the recipe or how long you bake it. For example, adding more evaporated milk or changing the milk mix can help. This will get the mochi just right.
Another issue is if the mochi doesn’t cook evenly. This might be because of the baking time or temperature. To fix this, try baking in a 9”x13” pan or two 8”x8” pans. Use a shorter baking time of about 25 to 30 minutes.
It’s also important to use Mochiko (16 oz) instead of regular rice flour. Regular rice flour doesn’t stick as well.
Butter mochi can also be too crumbly or too sticky. To fix this, adjust the unsalted butter or sugar in the recipe. Adding more eggs or different milk can also help. By fixing these common problems, you can make butter mochi that’s just right.
- Check if it’s done by inserting a toothpick in the middle. It should have a few crumbs.
- Use the right flour, like Mochiko.
- Adjust the baking time and temperature.
- Make sure you have the right amount of liquid, like evaporated milk and coconut milk.
By following these tips, you can make delicious butter mochi. It will impress everyone. Always use the best ingredients and follow the recipe closely. With practice and patience, you’ll get great at making butter mochi. Enjoy this tasty Hawaiian treat at home.
Serving and Presentation Ideas
There are many serving ideas to make butter mochi more appealing. You can serve it warm with whipped cream or vanilla ice cream. This classic combo is loved for its soft and chewy texture.
But you can also try modern presentation techniques. Arrange the mochi on a platter or individual plates in a nice way. You can also add fresh fruits or nuts for color and texture. Here are some ideas:
- Serve butter mochi with a side of sweet sauce or honey
- Top with fresh fruits, such as strawberries or blueberries
- Use edible flowers or leaves to add a pop of color
By trying different serving ideas and presentation techniques, you can make butter mochi a special treat. It will be memorable for you and your guests.
Make-Ahead and Storage Guidelines
Enjoying your freshly made butter mochi is easy. You can make it ahead and store it properly. Store it in an airtight container at room temperature for up to 2 days. This is great for serving later.
For longer storage, freezing is a good option. Freezing helps keep the texture and flavor of your butter mochi. It can be frozen for weeks. Just thaw it when you’re ready to serve. Make-ahead options are perfect for busy times or special events.
Here are some tips for storing your butter mochi:
- Store in an airtight container at room temperature for up to 2 days
- Freeze for longer storage, up to several weeks
- Thaw frozen butter mochi before serving
Following thesestorage guidelines keeps your butter mochi fresh and tasty. Whether you’re making it ahead or storing leftovers, proper storage is crucial. It helps maintain the quality of your butter mochi.
Conclusion: Mastering Your Butter Mochi Journey
Making butter mochi is an art that needs patience and practice. By following the detailed recipe and tips in this guide, you’re on your way to mastering this beloved Hawaiian treat. Remember, mastering butter mochi is a journey, not a destination.
Don’t be afraid to try different flavors and variations to make it your own. You can use traditional coconut milk or try dairy-free options. The key is to have fun and learn from each batch, as it will help you achieve the perfect butter mochi texture.
With the right ingredients, tools, and effort, you’ll soon be making fluffy, chewy butter mochi. You can enjoy it as a dessert, snack, or even in creative dishes. The conclusion of your butter mochi journey is just the start of a tasty culinary adventure.
FAQ
What is Mochiko Flour and why is it important for making butter mochi?
Mochiko Flour, also known as glutinous rice flour, is key for butter mochi’s texture. It makes the mochi soft and chewy, a must for this Hawaiian treat.
What is the difference between traditional Japanese mochi and butter mochi?
Butter mochi is a mix of cake and mochi, baked to perfection. It’s different from Japanese mochi because it’s baked, not pounded.
What are the essential ingredients needed to make perfect butter mochi?
To make perfect butter mochi, you need Mochiko Flour, the right coconut milk, and unsalted butter. Each ingredient is crucial for the right texture and taste.
What kitchen tools and equipment are needed to make butter mochi?
You’ll need a large mixing bowl and whisk to make butter mochi. A stand mixer can also help, making the process easier and the results better.
What are some common problems that may arise when making butter mochi, and how can they be fixed?
Problems like dense or dry mochi can be fixed by adjusting the recipe or baking time. The guide offers tips and solutions for the perfect texture.
Can butter mochi be made without coconut milk, and what are the alternatives?
Yes, you can make butter mochi without coconut milk. Half and half or unsweetened coffee cream can be used, but they change the flavor and texture.
How can I customize the flavor of my butter mochi?
You can add flavors like ube, pandan, or chocolate to your butter mochi. The recipe also shows how to make dietary adjustments.
How can I store butter mochi, and how long will it keep?
Store butter mochi in an airtight container at room temperature for up to 2 days. Freezing is also an option, with tips for thawing and serving.
Japanese Desserts: A Sweet Journey Through Tradition
Kodiak Cakes Pancake Recipe: Easy, Delicious, and Healthy
Mounds Cake Recipe: Irresistible Chocolate Coconut Delight